Big News! You can now set up auto recurring billing to your customers using their credit card or ACH method of payment.
Here are the steps required to set up this feature:
Step 1: At the top-right of QuickBooks Online, click the Company/Gear icon and select Recurring Transactions.

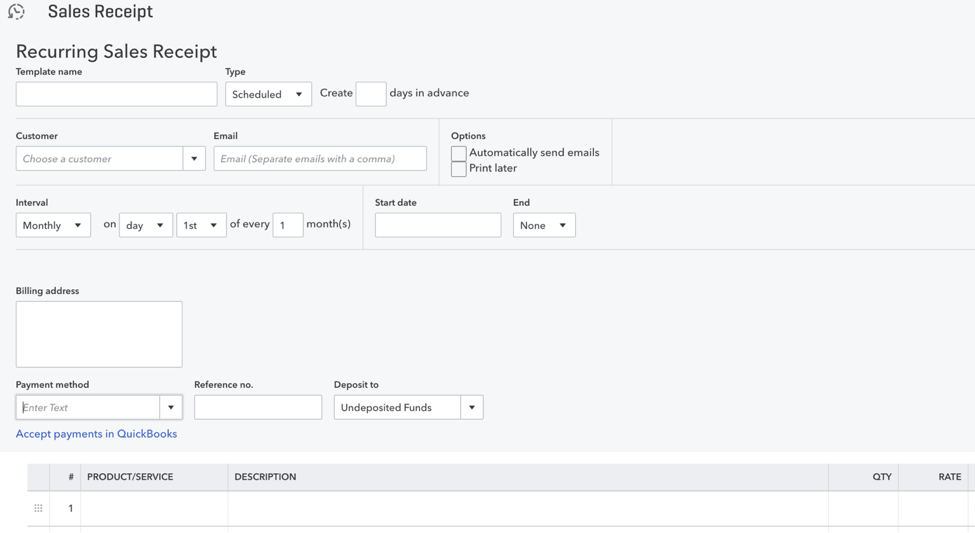
Step 2: From this selection, click the “New” button, then select Sales Receipt as the transaction type. A sales receipt template form appears.

Step 3: Name your template. Select “Scheduled” as the template type, enter how many days in advance you want this transaction created. You will need Customer, email address, select whether you want it to automatically send (we recommend). Then you will need to select how often along with a start and end date. Include the customer’s billing information, payment method, and then add the item codes needed for this recurring sales receipt.

Please note: your start date needs to be at least one day in the future. The End option (not required) allows you to stop the template from running after a certain number of times or on a specific date. If left empty, the template will continue to recur until you edit or delete it.
When you Select a credit card Payment Method and enter the card or check details if they are not yet saved in QuickBooks. Make sure the Process credit card or “echeck” or “check” checkbox is filled.
Step 4: Enter the rest of the transaction information just as you would on a one-time sales receipt.
Step 5: When you’re finished, click Save template. You are provided with a recurring credit card authorization form to print out.
Step 6: Card brand regulations require a recurring credit card authorization to be signed by the cardholder and retained by you. Ask your customer to fill out the form, sign it, and return it to you before the first recurring charge happens
Note: For your protection, we recommend keeping the signed form in a safe place for 18 months after the final charge takes place.
Step 7: You are returned to your list of recurring templates. Double-check the Next Date column to be sure you set the interval just how you want it. (Need to make changes? Click the template, then click the Edit button.)
If you don’t have an active payments account learn more here.

