

If you have or are planning on having multiple people work in your QuickBooks files; in order to protect your private financial information, it’s imperative that you utilize QuickBooks security features that define the user access and permission levels or your employees.
As a business owner, if you ever do your bookkeeping manually, you probably don’t allow every employee to see every sales form and account register and payroll stub (or at least, you shouldn’t). If you haven’t already, you most likely have established a system that allows staff user access to work only with information that related to their specific jobs. Even so, there may have been times when, for example, someone pulled the wrong file folder or was sent a report that he or she shouldn’t have seen.
QuickBooks helps prevent this by setting virtual boundaries for user access. This security feature helps you specify which features of the software can be accessed by which employees depending on who works with your accounting data. Through QuickBooks, your employees will receive a user access through a unique username and password that unlocks only the areas he or she should be visiting.
To help minimize errors, maintain data integrity, and preserve confidentiality, QuickBooks lets you restrict users to designated areas in the software.
Here’s how you as the Administrator can define these roles. Open the Company menu and select Set Up Users and Passwords | Set Up Users. The User List window opens. You should see yourself signed up as the Admin. Click Add User and enter a User Name and Password for the employee you’re adding. Confirm the Password and check the box in front of Add this user to my QuickBooks license. Click Next.
Note: You can have as many as five people working in your QuickBooks company file at the same time, depending on how many user licenses you’ve purchased. Not sure? Press F2 and look in the upper left corner. If you need more than five user licenses, talk to us about upgrading to QuickBooks Enterprise Solutions.
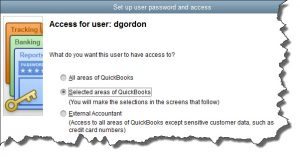
In the next window that opens (see above screen), you’ll be given three options. Probably you’ll most often select the second option, which lets you specify the screens this user can see and what he or she can do there. The first—All areas of QuickBooks—would seldom be granted. And the third allows us to come in and do whatever tasks have been outlined in our work relationship (troubleshooting, monitoring, creating and analyzing reports, etc.).
Click the button in front of Selected areas of QuickBooks and then Next. You’ll see the first in a series of screens that deal with the software’s functional areas: Sales and Accounts Receivable, Purchases and Accounts Payable, Checking and Credit Cards, Inventory, Time Tracking, Payroll and Employees, Sensitive Accounting Activities (funds transfers, online banking, etc.), Sensitive Financial Reporting, and Changing or Deleting Transactions.
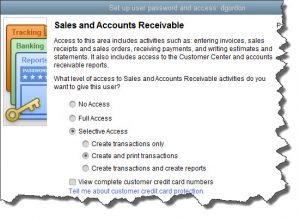
When you give employees Selective Access in a particular area, you can further define their roles there.
The Sales and Accounts Receivable screen is a good example. You can see the options offered in the above image. By clicking on the buttons pictured, you’re giving this employee permission to both create and print transactions. Below these options, you’ll be able to keep him or her from seeing customers’ credit card numbers in their entirety by clicking in the small box. When you’re finished, click Next.
Keep clicking Next and proceed through the rest of the screens. Your choices will be similar on each. But be sure to read all of the descriptive text very carefully. Keep in mind the importance of confidentiality issues and security as you go along.
The ninth screen, Changing or Deleting Transactions, deserves special attention. First, should this employee be able to change or delete transactions in his or her assigned area(s)? Even though you trusted these employees to work with finances when you hired them, consider this question carefully. Depending on the volume of transactions processed every day, you may want to reserve this ability for yourself.
We may or may not have established and password-protected a Closing Date for your company file. This is the date when the books for a specific time frame have been “closed,” meaning that transactions should not be entered, added, or deleted prior to it. We can talk with you about the pros and cons of such an action.
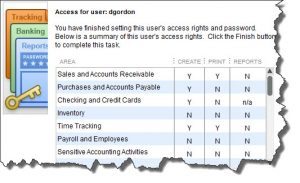
A summary of user access rights
Here and on every other screen in this multi-step wizard, you can always click the Back button if you want to return to a previous window. When you’re finished, you’ll see a screen like the one in the above image that summarizes the choices you have just made.
If you’re feeling any uncertainty or confusion about the whole issue of access rights, we’ll be happy to go over your options with you. These are important decisions, ones that not only protect your business but you and your employees. QuickBooks provides these tools to protect everyone who uses the software as well as any external individuals and companies that might be affected.
If you have any questions regarding this security feature or any other feature of QuickBooks, our experienced team is here for you. Contact us and any one of our knowledgeable associates is available to help answer any questions you may have.