
UNBOXING QUICKBOOKS 2018 (Available in QB Pro, Premier, Accountant & Enterprise unless noted)
MULTI-MONITOR SUPPORT:
We can now support up to 3 connected monitors. View > Switch to Multi-monitor Mode or Ctrl+Alt+M. Near the top right you will now see a Move Window to Next Monitor BUTTON. (Note: Currently this does not work in a hosted environment)

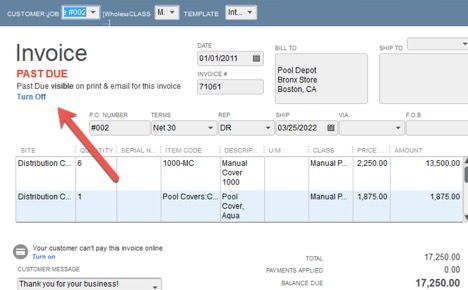
Past Due Stamp on Invoices
To use this feature, select Lists > Templates and select the template you want to modify. With the template selected, from the lower left Templates drop-down menu select Edit Template. On the Basic Customization window, place a checkmark in the Print Past Due Stamp.
Note: you can optionally select to Turn Off the Past Due stamp.

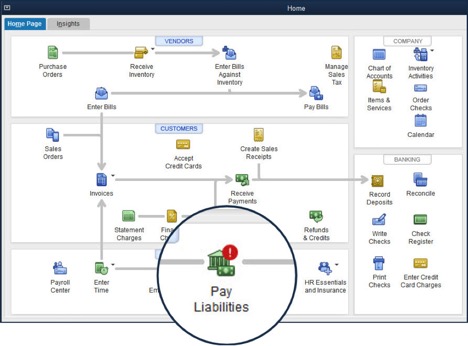
PAYROLL LIABILITY REMINDER
(Note you must have an Enhanced payroll subscription or Gold Edition of QuickBooks Enterprise)
MERGE MULTIPLE VENDORS (Only available as Admin/External Accountant user)
Note: Pro/Premier, the accountant has to have access to Accountant toolbox – available to paid ProAdvisors using their login.
Accountant > CLIENT DATA REVIEW > Merge Vendors
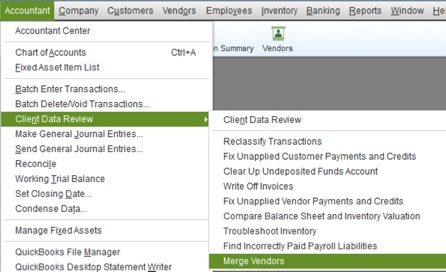
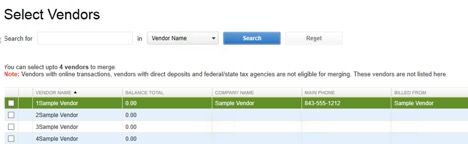
Select up to four individual vendor records, select one as the master record and merge them together. You can also, update the master record before you merge.
Note: There are some vendors that cannot be selected for a merge. They are vendors that use online banking, connected to payroll service or have direct deposit activated. They will not be listed above.
Be very careful when you merge vendors with 1099 information, their history will be merged.
Time Saving UPDATES:
Copy-Line and Paste-Line Keyboard Shortcuts
To copy an entire row on a transaction: Ctrl+Alt+Y. To paste the clipboard contents to a new row: Ctrl+Alt+V.
Copy and paste rows works with Invoices, Estimates, Sales Receipts, Sales Orders, Credit Memos, Purchase Orders and Timesheets in QuickBooks.
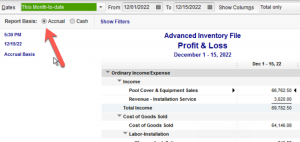
Cash/Accrual Toggle on Reports
Cash/Accrual toggle on the top left of a displayed report in QuickBooks Desktop.
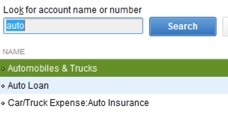
Search Chart of Accounts
Accessible: Search box on the Chart of Accounts window, from the menu bar, select Lists >Chart of Accounts.
No more searching through a long list.
Updated Email Security
Select Edit > Preferences > Send Forms > My Preferences. Select Webmail option & click Add. Select the “Use enhanced security” setting during the setup. You will need to have your Intuit my account login to complete the setup. Once setup, you no longer need to enter your webmail password when emailing from within QuickBooks.
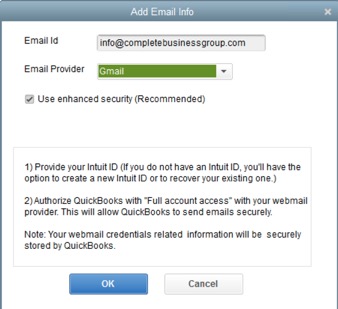
Features: QuickBooks 2018 includes securely sending of emails from Gmail, Outlook, Hotmail, MSN and Windows Live accounts through QuickBooks, using improved multi-factor authentication. Security includes signing in with your Intuit ID account. Access and refresh tokens track that you have authorized QuickBooks to access your webmail.
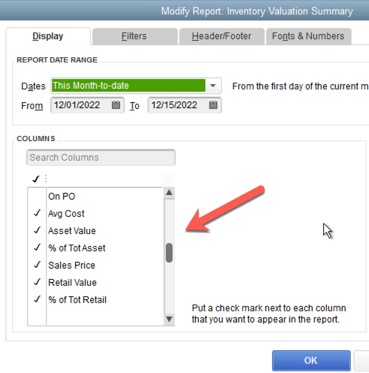
Inventory Report Customization
This works with
Select Reports > Inventory >
- Inventory Valuation Summary
- Detail, Inventory Stock Status by Item
- Assembly Shortage by Item
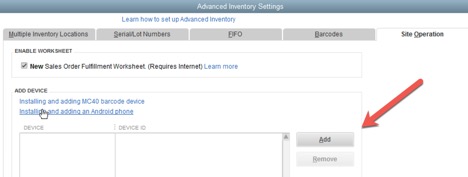
Mobile Inventory Scanning
ONLY AVAILABLE in QuickBooks Enterprise 18.0 Platinum Edition
Log into the Enterprise company file as the Admin user.
From the menu bar, select Edit > Preferences > Items & Inventory, and from the Company Preferences tab select Advanced Inventory Settings and then click on the Site Operation tab.
Then ADD the device you want to use:
- Motorola Zebra series MC barcode device or
- Android phone
The device will record inventory, & pick quantities at the warehouse.
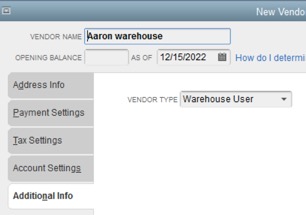
Create a vendor for each warehouse picker and assign the new vendor type: Warehouse User.
Mobile Scanner – overview of setup:
- Install the QuickBooks Desktop Warehouse mobile app on your Android device.
- Wirelessly connect Zebra mobile barcode device or Android phone to the QuickBooks Enterprise file.
Note: When picking inventory with the mobile device, barcodes can be scanned to record the quantity picked or the quantities can be manually updated on the mobile device.
Mobile inventory scanning works across multiple warehouses, anywhere that a warehouse has an internet connection.
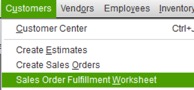
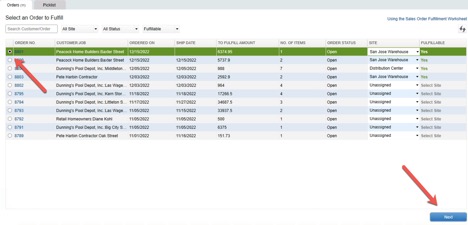
Sales Order Fulfillment Workflow
Included With: QuickBooks Enterprise 18.0 Platinum Edition
To setup, you have to login as the Admin user. From the menu bar, select Edit > Preferences > Items & Inventory, and from the Company Preferences tab select Advanced Inventory Settings, and then click on the Site Operation tab and select the New Sales Order Fulfillment Worksheet (Internet Required). As shown above.
Access to picklist on a mobile device or you can print the pick lists and update the picked quantity manually.
QuickBooks Sales Orders Provide Real-Time Picked Status Updates
What if your client does not want to use a mobile device? Print the picklist, take it to the floor and update the quantity picked. Return to QuickBooks Enterprise to manually update the quantity picked.
New Sales Order Fulfillment Workflow:
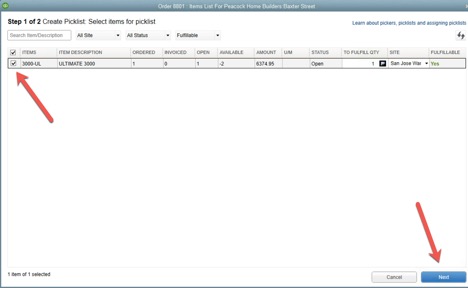
- Inventory pick lists are created from sales orders.
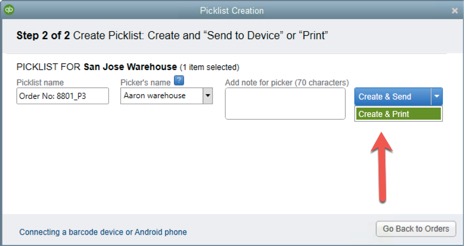
- Picklists are assigned to a Warehouse User and synced with the mobile device or printed.
- A Warehouse User signs into the mobile app from the warehouse location or uses printed copy as worksheet.
- The assigned picker scans barcodes or serial number barcodes or manually enters the quantity of items picked.
- Updated picklist details are sent back to the QuickBooks Enterprise file or manually entered.
If you feel like that was information overload or you need help getting started, here are a few options:
- If you would like a complementary consultation to help you select the right product you can schedule here.
- Watch our recent webinar on QuickBooks 2018 Unboxing here
- View our premier low pricing
- Place an order
We hope you found these tips helpful as we strive to always keep our clients updated with recent changes. Contact us anytime.