

You’re accustomed to money going in a certain direction, but sometimes you have to pay your customers. Here’s how it’s done.
QuickBooks is very good at helping you get paid by your customers. It comes equipped with customizable invoice templates for billing customers and sales receipts for recording instant sales. It supports online payments, so you can accept debit or credit cards and electronic checks. It simplifies the process of recording payments and it offers reports that let you keep track of it all.
There are times, though, when you have to issue a payment to a customer. QuickBooks provides forms that allow that transfer of funds: credit memos and refunds. Do you know when and how they should be used? Here are the basics.
Credit Memos
A credit memo is just what it sounds like. A customer returns an item for which they’ve already paid, and you have to credit him or her for its cost. This is the more complicated of the two and requires more bookkeeping since you’re tracking the sale, its payment, and the return item. You can deal with the amount of the credit by:
- Retaining the funds in the customer account.
- Issuing a refund.
- Applying it to the next open invoice.
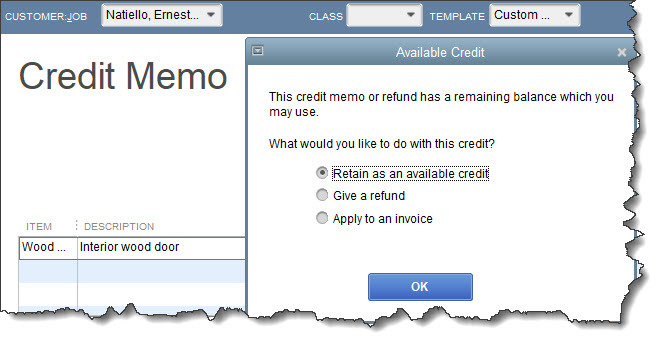
When you issue a credit memo to a customer, you have three options for returning the money they paid.
To create a credit memo, click Refunds & Credits on QuickBooks’ home page or open the Customers menu and select Create Credit Memos/Refunds. The Credit Memo window opens. Select the correct Customer: Job. In the line item section of the form, choose the merchandise returned in the Item column and enter a quantity. Repeat the process if more than one item was returned, then click Save & Close. The Available Credit window, pictured above, will open. Click the button in front of the option you want.
Select the first option if that’s what you want and click OK. The window will close, and the customer will have had that credit amount applied to his or her own account. You can see this in the Customer Center if you click on Customers in the navigation toolbar (or Customers | Customer Center). You can then either click on the Customers & Jobs tab and scroll down until you can highlight your customer’s record or click on Transactions | Credit Memos.
Click on Give a Refund to open the Issue a Refund window. Everything should be filled in here except for the payment method. If you select Cash from the Issue this refund via the drop-down list and then pick the correct account from the list that opens, the refund amount will be subtracted from the account. Select Check and then the Account, and check the box in front of To be printed. That refund will be in the list the next time you open the File menu, then Print Forms | Checks. Choose a credit card and check the box in front of Process credit card refund when saving box to issue a credit card refund automatically.
Tip: Can’t work with credit cards because you don’t have a merchant account? We can help you set this up.
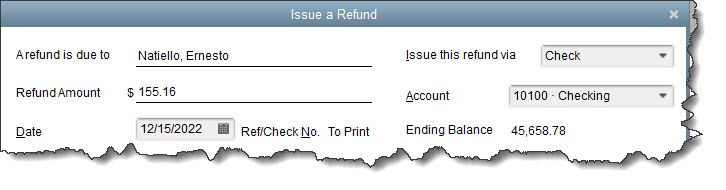
The Issue a Refund window
If there is an open invoice, the Apply Credit to Invoices window will open, containing a list of unpaid bills. If there isn’t already a checkmark in front of the invoice you want to apply it too, click in the first column to create one. QuickBooks will tell you how much credit was applied and whether any remains. When you’ve checked the screen for accuracy, click Done.
Dealing with Overpayments
Let’s say a customer is catching up on multiple outstanding invoices and he or she sends you a check for the total but overpays you. Open the Receive Payments window by going to Customers | Receive Payments or clicking Receive Payments on the home page. Select the customer and enter the Payment Amount and Check #. QuickBooks will have put a checkmark in front of all the outstanding invoices listed to indicate they’ve been paid.
In the lower left corner, you’ll see a section titled Overpayment. The extra amount and your two options for dealing with it appear here. You can either credit the customer or issue a refund. Click the action you want to take, then save the transaction.
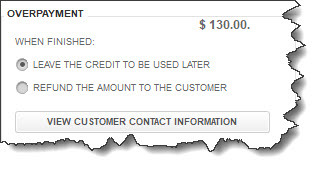
If a customer overpays you, you can use QuickBooks’ built-in tools to credit him or her.
You can also issue refunds through the Write Checks window, but this is a more complicated procedure. It’s easier to process a credit memo.
If you’re at all unclear about what we’ve described here, please contact us for assistance. Refunds or credits that come through incorrectly (or not at all) can make customers very unhappy and may affect future sales. So, let us help you get it right the first time. Schedule a consultation with our team.